

Shop this post

Adding wallpaper to a room seems messy and intimidating. But it doesn’t have to be! Follow along for a complete guide and the all the materials needed to make your first wallpaper project a success.

My first wallpaper project was this accent wall in my son’s room. I knew I was going to use those bookshelves by his bed, and wanted something with a bit of contrast as a background. This blue plaid wallpaper felt like the right choice for a tween (at the time) boy. He was not sold on the idea at first, but once he saw it up, loved it immediately!

After that first project, I was hooked! Decorating a space with wallpaper changes the dynamic of the room entirely. It adds warmth, coziness, interest and personality. I couldn’t wait to use it again.
Enter Abby’s room, where I decided to wallpaper the ceiling.
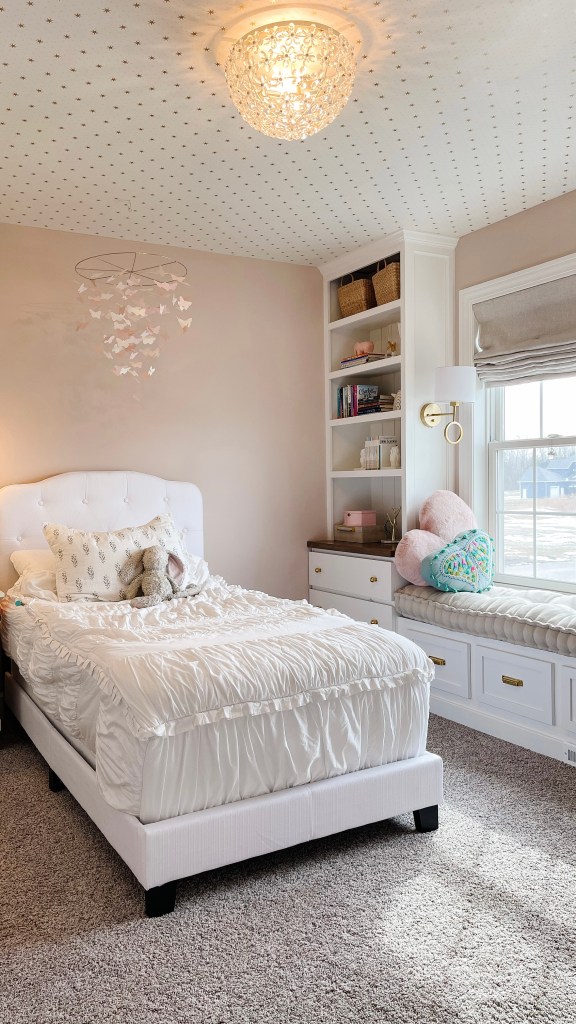
I don’t advise this if you are a wallpapering beginner (which I was). This is varsity level stuff. I think this process deserves its own blog post. The results, however, are beautiful. The rooms feels so romantic and sweet with that ceiling full of stars!

Soon after, I added this linen-inspired wallpaper to our office. I love how that texture and color break up all the dark blue tones in this room.

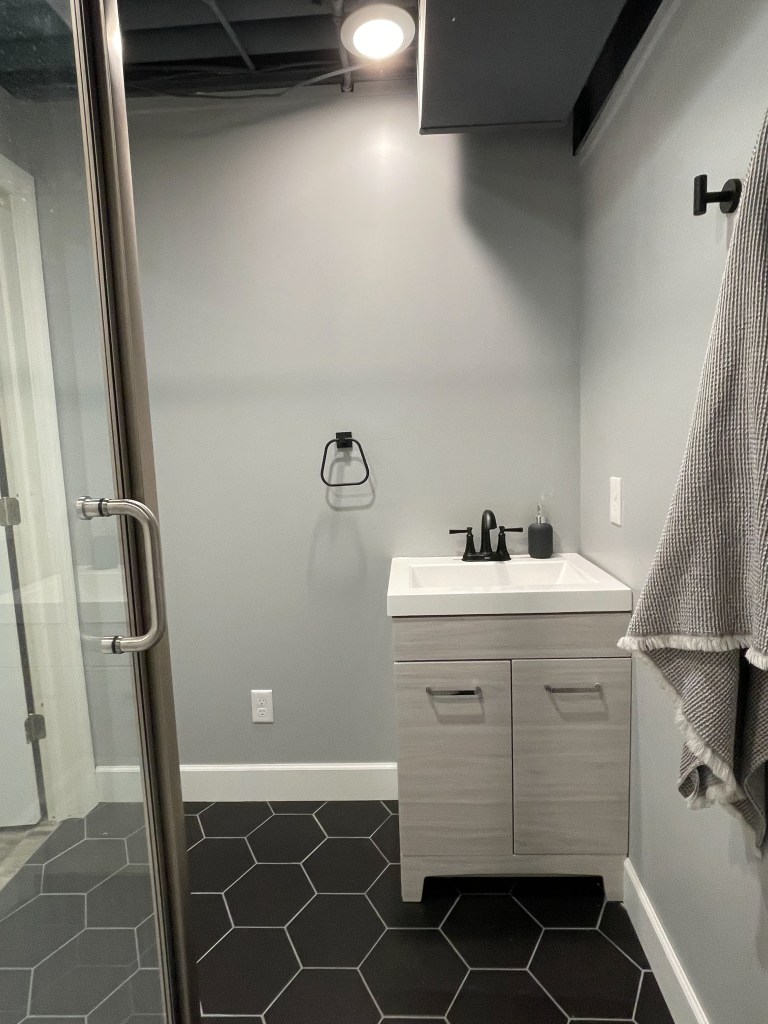
Another wallpapering project was this small bathroom in our basement. I loved the whimsical print of this black and white wallpaper and I thought it warms up this otherwise unremarkable little bathroom.

Once you start, you can’t go back to not using wallpaper. It’s like having potato chips – you can never have just one:) So naturally, when I was planning an update to our powder room, I had to bring in this beautiful wallpaper into the mix. The result is inviting, interesting, eclectic and memorable – exactly what I was going for.

Finally, this brings up to the last wallpaper project – our basement. Out of all the products I’ve used, this one is my favorite! I love the quality of this wallpaper: it’s thick, textured, and so easy to work with. I love the print of it, if looks like an old time library and gives you the feel of being wrapped in your favorite blanket.
I hope my experience convinced you to give wallpaper a try in your home. If you are nervous about adding it to a large space, start small. Here are some ideas for low-commitment spaces you can try your hand at it:
- an infrequently seen space, like a closet or a pantry
- as an accent wall in a bedroom or an office
- in a small space, like a bathroom
- on the back of a bookcase to add a little interest and texture
- bottom of the drawers in the bathroom or kitchen.
Before we get to the step-by-step, lets talk about different types of wallpaper. There are several varieties, such as peel-and-stick, pre-pasted and unpasted. Peal-and-stick kind would be perfect for renters, in a kid’s room or a dorm, when preference can change often, and removing it is easy. Pre-pasted kind can be messy and tricky, as it involves soaking the whole roll in a tub of water. My expertise so far is in the world of unpasted wallpaper, and that’s what this tutorial covers.
Let’s go through the process step by step
Materials needed:
- Wallpaper adhesive (this one is my favorite)
- Utility knife and sharp blades
- This smoothing tool
- Large paint roller
- A level
- Measuring tape and a pencil
- Lots of rags
- Wallpaper of your choice
First, we need to figure out how much wallpaper to buy. Measure your space – the hight and the length. Most purchasing sites will have a calculator where you can plug in your measurements and it will tell you exactly how many rolls you’ll need. If that feature is not available, figure out the area you’re working on (hight x length of each wall) and add up the total space. For example, if you’re working on an accent wall that is 10′ long and 8′ tall, the area would be 80 sq. ft. If the description of the roll says it covers 60 sq. ft., you’d need two rolls for that project. Always round up and get more to account for errors and wasted material.
To start, measure the length of the space you’re planning to cover. Lay out your wallpaper face (print side) down and mark that length plus 1.5-2 inches extra on both sides. Cut that piece of wallpaper across. I use a long piece of cardboard underneath to keep the mess contained and off the floor.

Next, apply the adhesive. My method is very inelegant, but it’s simple and it works. I pour the adhesive right out of the original container and right onto the wallpaper, moving along the length of the strip. It has the consistency of Elmer’s glue and comes out pretty evenly. Once you’ve poured a reasonable amount along the length of the wallpaper strip, spread it around with a large paint roller.
Here are some things I’ve tried and did not find useful for application of the adhesive: using a paint brush, using a paint tray as you would for painting a wall (just creates another thing to clean and wastes a lot of product), applying the adhesive to the wall, not the back of the wallpaper strip (you need more glue than the wall can handle without dripping). You want to see the back of your wallpaper strip evenly covered, just like you would if you were using glue and construction paper.
Fold the strip onto itself, goopy side in, leaving the top section available to pick up. Then line it up on the wall, making sure the first strip is perfectly plumb (meaning it’s level). The adhesive makes it easy to slide the wallpaper along the wall until you find the perfect position.
Once you’ve made sure it’s it the right position, start working the smoother to squeeze extra glue out and smooth out any air bubbles you may have. I prefer to work from top down, and catch any extra glue that seeps out on the sides with a wet rag. Once that’s up, run the flat edge of the smoothing tool along the top and the bottom of the wall, with the utility knife following the blade to cut off the excess.
Pro tip: if your space allows, hang your first strip in a less visible spot (like a corner, or by the door). That way, when you make your way around the room and the print is not matching perfectly, it’s not very visible or obvious.


Now that the first strip is up and everything is smoothed out, time to match the print for the next piece. I usually just hold up the roll by the top, let the rest fall to the floor and move it around until I match up the print. Then with my pencil, I mark where the top of my next strip would have to be in order for the print to match up ( where it meets the ceiling).
Once that’s marked, I cut the next strip, leaving 1-1.5″ extra at the bottom. Flip it over, spread the adhesive and put it up on the wall, sliding it in place to make sure the edges match up.
Pro tip: depending on the thickness of the wallpaper, you may want to overlay the edges. If the wallpaper is on a thinner side, the overlay may be up to 1/16″. If it’s thicker or textured, no overlay needed, just butt the edges right up against each other.
Make your way along the space, paying attention to the print. Have plenty of wet rags on hand to make sure you’re wiping the extra glue off. Cutting around the outlets, window and door trim with the smoother and the utility knife makes the process fast and easy.
The most rewarding part of the process is when you start to notice the difference in the as you move across the room. Step back and check out your work often to make sure the pattern is preserved and everything is looking level.
If things don’t line up properly, don’t get discouraged. Give yourself some time to figure it out. Remember, it’s very easy to adjust wallpaper while the glue is still wet.

I hope this gives you the inspiration to take on a small wallpapering project in your home. Trust me, once you start, you’ll never go back to blank walls!