
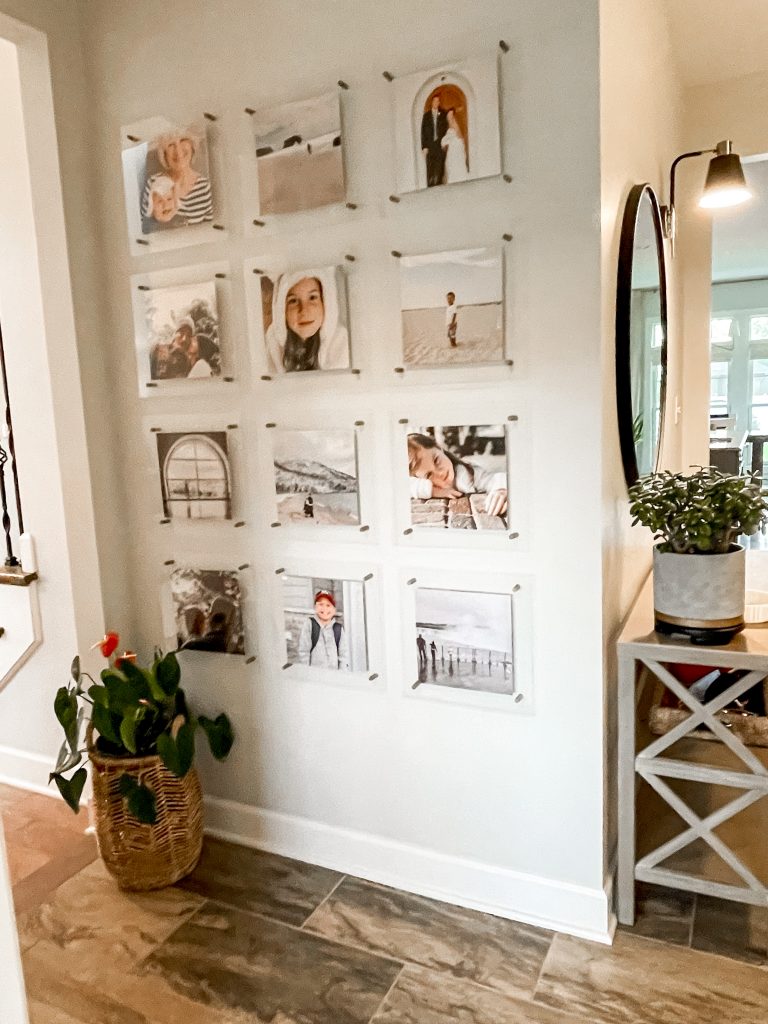
I knew as soon as we moved in that this wall, just off the main entrance, would be a perfect place for family photos. It has great visibility from several high traffic areas in the house, with plenty of light and lots of room.

I also knew that in the past my attempts to create organic free-form gallery arrangements fell flat. This time I decided on a grid layout for a much cleaner option. My next concern was that a 9-foot wall could look very cluttered with multiple frames on it. Therefore, I wanted to create something modern, clean, and kid friendly that would have high visual impact at first sight.
I have always been attracted to the look of acrylic frames with metal stand offs, but the price was not for me. After looking around, I came up with a plan.
I laid out the grid to determine the size of the frames and their spacing.

This seemed like the best fit to me: 12″x12″ frames housing 10″x10″ photos, separated by approximately 2″ each way.
Cut plexiglass squares to size.
I found these plexiglass sheets at my local Lowe’s, and had them cut to size squares right at the store. Then it was time to find the right hardware. I had gold offset fixtures in mind, but was not able to find them in the right size with that finish at the right price. So I chose a set of these and spray painted them gold. I love the way the turned out!

Determined the location for the hardware.
Drilling the holes for the hardware was by far the step that required the most patience and planning. First, I taped the corners with masking tape, to make sure they do not splinter or crack while I drill the holes.

Next, I created a template to ensure that the placement of the hardware was consistent across all frames.

Then it was time to drill the holes. In reality, it is not drilling so much as it is melting the plexiglass with the drill bit. The safest way I found, without ruining the frames or making them split or crack was to make a very shallow pilot hole first, then put the drill in reverse and apply very mild pressure. The friction of the drill against the plexiglass is enough to melt the hole and create the opening for the hardware.
Install the frames with our favorite family photos.

Next it was time to pick out 12 photos out of some of my favorite shots. I searched through our archives, mixing some of our formal memories with family candids. This is the final layout!

I attached them to the underside of the frames with double sided tape, since I don’t have a second layer of plexiglass holding the photos in place. It worked out really well.
When putting each frame up, I held it up agains the wall first, making sure it is level. Then I marked the openings in the four corners, and then put the anchor in the wall, followed by attaching the hardware in place. Then attach the frames to the hardware, screwing the top piece into place.

I can see us updating these photos after a while, as our family changes and the kids grow. But I have to tell you, every time I walk by, I smile. It just feels like a sweet reminder of all the best things in our lives.

It was so easy to let this wall become an afterthought, throwing a meaningless filler accessory on it. In fact, that’s exactly what was there when we originally saw the house.

But with it a little attention and some planning, this became one of my favorite little moments in our home.

This is one of the first spots people notice when then walk in, it gets so many compliments! It’s clean, bright, kid-friendly and can easily change with our family. And it makes me so happy every time I catch glimpse of one of my favorite faces!